
重塑创意边界:通义万相2.2+DeepSeek-V3.1+Qwen-Image多模态视频生成实战
·
重塑创意边界:通义万相2.2+DeepSeek-V3.1+Qwen-Image多模态视频生成实战
多模态AI创意工作流正彻底改变数字内容生产范式,本文将深度解析如何整合三大顶尖模型——通义万相2.2(视频生成)、DeepSeek-V3.1(风格控制与提示词优化)和Qwen-Image(图像生成),构建高效创意视频生成管道。
一、多模态创意工作流架构设计
1.1 系统架构与模型协同机制
现代多模态内容生成系统采用分层架构设计,实现文本到视频的端到端生成:
三大模型的技术定位与协同作用:
- DeepSeek-V3.1: 作为大脑和控制器,负责创意解析、风格化提示词生成和多步骤任务规划
- Qwen-Image: 作为视觉基础,生成高质量关键帧和场景设定,目前中文语境下效果最佳的文生图模型
- 通义万相2.2: 作为运动引擎,实现图像到视频的转换和直接文本到视频的生成
1.2 环境配置与依赖管理
完整的多模态创作环境需要配置以下依赖:
# requirements.txt
# 深度学习框架
torch==2.1.0
torchvision==0.16.0
transformers==4.35.0
diffusers==0.24.0

# 多模态处理库
openai-clip==1.0.0
mediapipe==0.10.0
opencv-python==4.8.1

# 图像视频处理
Pillow==10.0.0
imageio==2.31.0
imageio-ffmpeg==0.4.9
scikit-image==0.22.0

# 科学计算
numpy==1.24.0
scipy==1.11.0
pandas==2.0.0

# API客户端
qianfan==0.3.0  # 千帆平台SDK
modelscope==1.10.0  # 魔搭社区SDK
deepseek-api==0.2.0  # DeepSeek官方SDK

# 工具库
tqdm==4.66.0
loguru==0.7.0
configparser==6.0.0
安装脚本:
#!/bin/bash
# install_dependencies.sh

echo "设置Python虚拟环境..."
python -m venv multimodal_workspace
source multimodal_workspace/bin/activate

echo "安装PyTorch与CUDA支持..."
pip install torch torchvision torchaudio --index-url https://download.pytorch.org/whl/cu118

echo "安装基础依赖..."
pip install -r requirements.txt

echo "下载预训练模型权重..."
python -c "
from transformers import AutoModel, AutoProcessor
from diffusers import StableVideoDiffusionPipeline

# 下载Qwen-Image模型
qwen_model = AutoModel.from_pretrained('Qwen/Qwen-Image-Chat', trust_remote_code=True)
qwen_processor = AutoProcessor.from_pretrained('Qwen/Qwen-Image-Chat', trust_remote_code=True)

# 下载通义万相相关模型
svd_pipe = StableVideoDiffusionPipeline.from_pretrained(
    'stabilityai/stable-video-diffusion-img2vid-xt',
    torch_dtype=torch.float16,
    variant='fp16'
)
"

echo "环境验证..."
python -c "
import torch
print(f'PyTorch版本: {torch.__version__}')
print(f'CUDA可用: {torch.cuda.is_available()}')
print(f'设备数量: {torch.cuda.device_count()}')
print(f'当前设备: {torch.cuda.current_device()}')
print(f'设备名称: {torch.cuda.get_device_name(0)}')
"
二、DeepSeek提示词工程与风格控制
2.1 高级提示词架构设计
高质量视频生成依赖于精细的提示词工程,DeepSeek在此环节发挥核心作用:
class DeepSeekPromptEngineer:
    def __init__(self, api_key, model_version="deepseek-chat"):
        self.api_key = api_key
        self.model_version = model_version
        self.prompt_templates = self._load_templates()

    def _load_templates(self):
        """加载多场景提示词模板"""
        return {
            "cinematic": {
                "template": "电影级{scene_type}场景,{visual_style}风格,{lighting}光照," +
                          "{color_palette}色调,{camera_angle}角度,{lens_type}镜头," +
                          "动态效果:{motion_effect},情感氛围:{mood}",
                "defaults": {
                    "lighting": "戏剧性光影",
                    "color_palette": "高对比度冷暖色",
                    "camera_angle": "低角度跟踪拍摄",
                    "lens_type": "变形宽银幕镜头",
                    "motion_effect": "平滑运镜与慢动作"
                }
            },
            "animation": {
                "template": "{animation_style}动画风格,{character_design}角色设计," +
                          "{environment_style}场景,{movement_style}运动模式," +
                          "色彩方案:{color_scheme},细节层次:{detail_level}",
                "defaults": {
                    "movement_style": "夸张弹性运动",
                    "detail_level": "精细纹理与粒子效果"
                }
            },
            "documentary": {
                "template": "纪录片风格,{realism_level}真实感,{cinematography_style}摄影," +
                          "{time_period}时代感,{atmosphere}氛围,{audio_visual_style}声画风格",
                "defaults": {
                    "realism_level": "高度写实",
                    "cinematography_style": "手持摄影自然光"
                }
            }
        }

    def enhance_prompt(self, basic_prompt, style="cinematic", **kwargs):
        """使用DeepSeek API增强基础提示词"""
        import openai

        openai.api_key = self.api_key
        openai.api_base = "https://api.deepseek.com/v1"

        template = self.prompt_templates.get(style, self.prompt_templates["cinematic"])
        template_params = template["defaults"].copy()
        template_params.update(kwargs)

        # 构建优化请求
        system_message = """你是一名专业的视觉艺术提示词工程师,擅长将简单描述转化为详细、富有表现力的多模态生成提示词。

        请遵循以下原则:
        1. 包含视觉风格、光照、色彩、构图、镜头运动等专业元素
        2. 使用行业标准术语和丰富的形容词
        3. 保持中文语境但适当加入英文专业术语
        4. 确保提示词在不同模型间的兼容性
        5. 添加适当的权重控制符如(强调元素:1.2)或[减弱元素:0.8]"""

        user_message = f"请将以下简单提示词优化为专业的{style}风格视频生成提示词:{basic_prompt}"

        try:
            response = openai.ChatCompletion.create(
                model=self.model_version,
                messages=[
                    {"role": "system", "content": system_message},
                    {"role": "user", "content": user_message}
                ],
                temperature=0.7,
                max_tokens=500
            )

            enhanced_prompt = response.choices[0].message.content.strip()
            return self._apply_template(enhanced_prompt, template, template_params)

        except Exception as e:
            print(f"DeepSeek API调用失败: {e}")
            return self._apply_template(basic_prompt, template, template_params)

    def _apply_template(self, prompt, template, params):
        """应用具体风格的模板"""
        try:
            return template["template"].format(**params) + f",主题内容:{prompt}"
        except KeyError as e:
            print(f"模板参数错误: {e}")
            return prompt

# 使用示例
if __name__ == "__main__":
    engineer = DeepSeekPromptEngineer(api_key="your_deepseek_api_key")

    basic_prompt = "一只狐狸在森林中奔跑"
    enhanced_prompt = engineer.enhance_prompt(
        basic_prompt,
        style="cinematic",
        scene_type="奇幻森林",
        visual_style="梦幻写实",
        lighting="黄昏逆光",
        mood="神秘而自由"
    )

    print("优化后的提示词:", enhanced_prompt)
2.2 多模态提示词分解与路由
复杂创意需求需要分解为多个子任务并路由到相应模型:
class MultimodalOrchestrator:
    def __init__(self, deepseek_engineer):
        self.engineer = deepseek_engineer
        self.task_routes = {
            "character_design": "qwen-image",
            "background_scene": "qwen-image",
            "dynamic_motion": "wan2.2",
            "style_transfer": "qwen-image+wan2.2",
            "full_video": "wan2.2"
        }

    def analyze_requirement(self, user_request):
        """使用DeepSeek分析用户需求并分解任务"""
        import openai

        system_prompt = """你是一名多模态AI工作流调度专家,需要分析用户的创意需求并将其分解为适合不同模型执行的子任务。

        输出格式为JSON:
        {
            "main_style": "主要风格类型",
            "subtasks": [
                {
                    "type": "任务类型",
                    "description": "任务描述",
                    "target_model": "目标模型",
                    "priority": 优先级1-10
                }
            ],
            "dependencies": ["任务依赖关系"],
            "estimated_steps": 预计步骤数
        }"""

        response = openai.ChatCompletion.create(
            model="deepseek-chat",
            messages=[
                {"role": "system", "content": system_prompt},
                {"role": "user", "content": user_request}
            ],
            temperature=0.3,
            response_format={"type": "json_object"}
        )

        return json.loads(response.choices[0].message.content)

    def generate_execution_plan(self, analysis_result):
        """生成执行计划"""
        execution_plan = {
            "total_steps": len(analysis_result["subtasks"]),
            "current_step": 0,
            "tasks": [],
            "intermediate_results": {}
        }

        # 根据优先级排序任务
        sorted_tasks = sorted(analysis_result["subtasks"],
                             key=lambda x: x["priority"],
                             reverse=True)

        for task in sorted_tasks:
            execution_plan["tasks"].append({
                "type": task["type"],
                "model": task["target_model"],
                "prompt": self._generate_task_prompt(task, analysis_result),
                "status": "pending"
            })

        return execution_plan

    def _generate_task_prompt(self, task, analysis_result):
        """为特定任务生成精准提示词"""
        base_context = f"整体风格:{analysis_result['main_style']}。"

        if task["type"] == "character_design":
            return self.engineer.enhance_prompt(
                task["description"],
                style="animation",
                character_design="详细角色表",
                detail_level="高精度纹理"
            )
        elif task["type"] == "background_scene":
            return self.engineer.enhance_prompt(
                task["description"],
                style="cinematic",
                scene_type="环境场景",
                lighting="全局光照",
                detail_level="8K超高清"
            )
        elif task["type"] == "dynamic_motion":
            return self.engineer.enhance_prompt(
                task["description"],
                style="cinematic",
                motion_effect="流畅动态效果",
                camera_angle="多角度拍摄"
            )

        return task["description"]

# 使用示例
orchestrator = MultimodalOrchestrator(deepseek_engineer)

user_request = "创建一部关于机械狐狸在未来城市中寻找家园的短动画片,要有赛博朋克风格和情感表达"

analysis = orchestrator.analyze_requirement(user_request)
print("任务分析结果:", json.dumps(analysis, indent=2, ensure_ascii=False))

execution_plan = orchestrator.generate_execution_plan(analysis)
print("执行计划:", json.dumps(execution_plan, indent=2, ensure_ascii=False))
三、Qwen-Image文生图核心技术解析
3.1 高质量图像生成与控制
Qwen-Image作为中文语境下最强的文生图模型,提供精准的图像生成能力:
class QwenImageGenerator:
    def __init__(self, model_path="Qwen/Qwen-Image-Chat"):
        self.device = "cuda" if torch.cuda.is_available() else "cpu"
        self.model, self.processor = self._load_model(model_path)

    def _load_model(self, model_path):
        """加载Qwen-Image模型"""
        from transformers import AutoModelForCausalLM, AutoProcessor

        print(f"加载Qwen-Image模型从 {model_path}...")

        model = AutoModelForCausalLM.from_pretrained(
            model_path,
            torch_dtype=torch.float16,
            device_map="auto",
            trust_remote_code=True
        )

        processor = AutoProcessor.from_pretrained(
            model_path,
            trust_remote_code=True
        )

        return model, processor

    def generate_image(self, prompt, negative_prompt="", size=(1024, 1024),
                      num_inference_steps=20, guidance_scale=7.5):
        """生成单张图像"""
        from diffusers import StableDiffusionPipeline
        import torch

        # 使用类似的扩散模型管道,实际需替换为Qwen专用接口
        pipe = StableDiffusionPipeline.from_pretrained(
            "runwayml/stable-diffusion-v1-5",
            torch_dtype=torch.float16,
        ).to(self.device)

        # 提示词预处理
        processed_prompt = self._preprocess_prompt(prompt)

        # 生成图像
        with torch.autocast(self.device):
            image = pipe(
                prompt=processed_prompt,
                negative_prompt=negative_prompt,
                height=size[1],
                width=size[0],
                num_inference_steps=num_inference_steps,
                guidance_scale=guidance_scale
            ).images[0]

        return image

    def generate_character_sheet(self, character_description, style="animation"):
        """生成角色设定表"""
        prompts = {
            "full_body": f"{character_description},全身造型,正面视角,角色设计表,{style}风格",
            "close_up": f"{character_description},脸部特写,表情细节,{style}风格",
            "side_view": f"{character_description},侧面视角,体型轮廓,{style}风格",
            "action_pose": f"{character_description},动态姿势,动作线条,{style}风格"
        }

        character_sheet = {}
        for pose, prompt in prompts.items():
            character_sheet[pose] = self.generate_image(prompt)

        return character_sheet

    def generate_storyboard(self, script_segments, style="cinematic"):
        """为视频生成故事板"""
        storyboard = []

        for i, segment in enumerate(script_segments):
            prompt = self._create_storyboard_prompt(segment, style, i, len(script_segments))
            image = self.generate_image(prompt)

            storyboard.append({
                "segment_id": i,
                "description": segment,
                "image": image,
                "prompt": prompt
            })

        return storyboard

    def _preprocess_prompt(self, prompt):
        """提示词预处理"""
        # 中文提示词优化
        chinese_enhancements = {
            "高质量": "masterpiece, best quality, 8K UHD",
            "高清": "high resolution, detailed",
            "精美": "exquisitely detailed",
            "华丽": "ornate, lavish",
            "梦幻": "dreamlike, ethereal",
            "赛博朋克": "cyberpunk, neon, futuristic"
        }

        for cn, en in chinese_enhancements.items():
            if cn in prompt:
                prompt += f", {en}"

        return prompt

# 使用示例
if __name__ == "__main__":
    generator = QwenImageGenerator()

    # 生成角色设定
    character_desc = "机械狐狸,银色金属外壳,蓝色发光纹路,未来科技感,有情感表达"
    character_sheet = generator.generate_character_sheet(character_desc, "cyberpunk")

    # 保存结果
    for pose, img in character_sheet.items():
        img.save(f"character_{pose}.png")

    # 生成故事板
    script = [
        "机械狐狸在霓虹灯下的雨中苏醒",
        "狐狸在未来城市的屋顶间跳跃穿梭",
        "狐狸遇到其他机械生物,进行情感交流",
        "狐狸找到废弃的工厂,开始建造家园"
    ]

    storyboard = generator.generate_storyboard(script, "cinematic")
    for i, frame in enumerate(storyboard):
        frame["image"].save(f"storyboard_frame_{i}.png")
3.2 高级图像控制技术
class AdvancedImageController:
    def __init__(self, generator):
        self.generator = generator

    def generate_with_controlnet(self, prompt, control_image, control_type="pose"):
        """使用ControlNet进行精确控制"""
        from diffusers import ControlNetModel, StableDiffusionControlNetPipeline
        from diffusers.utils import load_image

        # 加载对应的ControlNet模型
        if control_type == "pose":
            controlnet = ControlNetModel.from_pretrained(
                "lllyasviel/sd-controlnet-openpose",
                torch_dtype=torch.float16
            )
        elif control_type == "depth":
            controlnet = ControlNetModel.from_pretrained(
                "lllyasviel/sd-controlnet-depth",
                torch_dtype=torch.float16
            )
        elif control_type == "canny":
            controlnet = ControlNetModel.from_pretrained(
                "lllyasviel/sd-controlnet-canny",
                torch_dtype=torch.float16
            )
        else:
            raise ValueError(f"不支持的control类型: {control_type}")

        pipe = StableDiffusionControlNetPipeline.from_pretrained(
            "runwayml/stable-diffusion-v1-5",
            controlnet=controlnet,
            torch_dtype=torch.float16
        ).to(self.generator.device)

        # 生成图像
        image = pipe(
            prompt=prompt,
            image=control_image,
            num_inference_steps=20,
            guidance_scale=7.5
        ).images[0]

        return image

    def generate_consistent_character(self, character_description, base_image,
                                    poses, expressions, style="animation"):
        """生成一致角色的多姿态多表情"""
        results = {}

        for pose in poses:
            for expression in expressions:
                prompt = f"{character_description},{pose},{expression},{style}风格,角色一致性"

                # 使用IP-Adapter保持角色一致性
                image = self._generate_with_ip_adapter(prompt, base_image)

                results[f"{pose}_{expression}"] = image

        return results

    def _generate_with_ip_adapter(self, prompt, reference_image):
        """使用IP-Adapter保持图像一致性"""
        from diffusers import StableDiffusionPipeline, IPAdapterPipeline

        # 这里简化实现,实际需要使用IP-Adapter集成
        pipe = StableDiffusionPipeline.from_pretrained(
            "runwayml/stable-diffusion-v1-5",
            torch_dtype=torch.float16
        ).to(self.generator.device)

        # 实际应用中需要集成IP-Adapter
        image = pipe(
            prompt=prompt,
            num_inference_steps=20,
            guidance_scale=7.5
        ).images[0]

        return image

# 使用示例
controller = AdvancedImageController(generator)

# 使用姿势控制生成图像
pose_image = load_image("reference_pose.png")
controlled_image = controller.generate_with_controlnet(
    "机械狐狸在月光下站立,赛博朋克风格",
    pose_image,
    control_type="pose"
)

# 生成多表情角色
base_character = character_sheet["full_body"]
expressions = ["高兴", "悲伤", "惊讶", "愤怒"]
poses = ["站立", "坐下", "奔跑"]

consistent_characters = controller.generate_consistent_character(
    "机械狐狸,银色金属外壳",
    base_character,
    poses,
    expressions,
    "cyberpunk"
)
四、通义万相2.2视频生成深度应用
4.1 文生视频与图生视频核心技术
class TongyiWanxiangGenerator:
    def __init__(self, api_key, api_secret):
        self.api_key = api_key
        self.api_secret = api_secret
        self.base_url = "https://dashscope.aliyuncs.com/api/v1"

    def _get_auth_header(self):
        """获取认证头"""
        from datetime import datetime
        import hashlib
        import hmac
        import base64

        # 构建阿里云API签名
        now = datetime.utcnow().strftime('%a, %d %b %Y %H:%M:%S GMT')
        sign_string = f"x-date: {now}"
        signature = base64.b64encode(
            hmac.new(
                self.api_secret.encode('utf-8'),
                sign_string.encode('utf-8'),
                hashlib.sha1
            ).digest()
        ).decode()

        authorization = f'hmac username="{self.api_key}", algorithm="hmac-sha1", headers="x-date", signature="{signature}"'

        return {
            'Authorization': authorization,
            'x-date': now,
            'x-api-version': '2023-10-30'
        }

    def text_to_video(self, prompt, duration=5, resolution=(1024, 576),
                     style="realistic", motion_intensity=0.8):
        """文本生成视频"""
        import requests
        import json

        url = f"{self.base_url}/services/video/text-to-video"

        payload = {
            "model": "wanx-video-v1",
            "input": {
                "prompt": prompt,
                "style": style,
                "motion_intensity": motion_intensity
            },
            "parameters": {
                "duration": duration,
                "resolution": f"{resolution[0]}x{resolution[1]}"
            }
        }

        headers = self._get_auth_header()
        headers['Content-Type'] = 'application/json'

        response = requests.post(url, headers=headers, data=json.dumps(payload))

        if response.status_code == 200:
            result = response.json()
            task_id = result.get('output', {}).get('task_id')
            return self._wait_for_task(task_id)
        else:
            raise Exception(f"API调用失败: {response.status_code}, {response.text}")

    def image_to_video(self, image_path, prompt="", duration=3,
                      motion_intensity=0.7, camera_motion="slow_pan"):
        """图像生成视频"""
        import requests
        import json
        import base64

        # 读取并编码图像
        with open(image_path, "rb") as image_file:
            encoded_image = base64.b64encode(image_file.read()).decode('utf-8')

        url = f"{self.base_url}/services/video/image-to-video"

        payload = {
            "model": "wanx-video-v1",
            "input": {
                "image": f"data:image/jpeg;base64,{encoded_image}",
                "prompt": prompt,
                "camera_motion": camera_motion
            },
            "parameters": {
                "duration": duration,
                "motion_intensity": motion_intensity
            }
        }

        headers = self._get_auth_header()
        headers['Content-Type'] = 'application/json'

        response = requests.post(url, headers=headers, data=json.dumps(payload))

        if response.status_code == 200:
            result = response.json()
            task_id = result.get('output', {}).get('task_id')
            return self._wait_for_task(task_id)
        else:
            raise Exception(f"API调用失败: {response.status_code}, {response.text}")

    def _wait_for_task(self, task_id, timeout=300):
        """等待任务完成"""
        import time
        import requests

        url = f"{self.base_url}/tasks/{task_id}"

        start_time = time.time()
        while time.time() - start_time < timeout:
            headers = self._get_auth_header()
            response = requests.get(url, headers=headers)

            if response.status_code == 200:
                task_status = response.json()
                status = task_status.get('output', {}).get('status')

                if status == 'SUCCEEDED':
                    return task_status.get('output', {}).get('video_url')
                elif status in ['FAILED', 'CANCELLED']:
                    raise Exception(f"任务失败: {task_status}")

            time.sleep(5)

        raise TimeoutError("任务等待超时")

    def generate_video_from_storyboard(self, storyboard, transition_style="smooth"):
        """从故事板生成完整视频"""
        video_segments = []

        for i, frame in enumerate(storyboard):
            print(f"生成第 {i+1}/{len(storyboard)} 段视频...")

            # 保存临时图像
            temp_image_path = f"temp_frame_{i}.png"
            frame['image'].save(temp_image_path)

            # 为每个故事板帧生成短视频片段
            prompt = f"{frame['prompt']},{transition_style}过渡"

            try:
                video_url = self.image_to_video(
                    temp_image_path,
                    prompt=prompt,
                    duration=4,  # 每个片段4秒
                    motion_intensity=0.6 if i == 0 else 0.7,
                    camera_motion="slow_zoom" if i % 2 == 0 else "static"
                )

                video_segments.append({
                    "segment_id": i,
                    "video_url": video_url,
                    "duration": 4
                })

            except Exception as e:
                print(f"生成第 {i} 段视频失败: {e}")
                continue

        return video_segments

# 使用示例
wanxiang = TongyiWanxiangGenerator(api_key="your_api_key", api_secret="your_api_secret")

# 文生视频示例
video_url = wanxiang.text_to_video(
    "机械狐狸在霓虹灯下的雨中行走,赛博朋克风格,电影质感",
    duration=5,
    resolution=(1280, 720),
    style="cyberpunk",
    motion_intensity=0.8
)

print("生成的视频URL:", video_url)

# 从故事板生成完整视频
video_segments = wanxiang.generate_video_from_storyboard(storyboard, "cinematic")
4.2 视频后期处理与增强
class VideoPostProcessor:
    def __init__(self):
        self.ffmpeg_path = self._find_ffmpeg()

    def _find_ffmpeg(self):
        """查找FFmpeg可执行文件"""
        import shutil
        return shutil.which("ffmpeg") or "/usr/bin/ffmpeg"

    def download_video(self, url, output_path):
        """下载视频文件"""
        import requests

        response = requests.get(url, stream=True)
        if response.status_code == 200:
            with open(output_path, 'wb') as f:
                for chunk in response.iter_content(chunk_size=8192):
                    f.write(chunk)
            return True
        return False

    def concatenate_videos(self, video_paths, output_path, transition_duration=1.0):
        """拼接多个视频并添加转场效果"""
        import subprocess
        import tempfile
        import os

        # 创建临时文件列表
        with tempfile.NamedTemporaryFile(mode='w', suffix='.txt', delete=False) as f:
            for path in video_paths:
                f.write(f"file '{os.path.abspath(path)}'\n")
            list_path = f.name

        try:
            # 使用FFmpeg concat滤镜
            cmd = [
                self.ffmpeg_path,
                '-f', 'concat',
                '-safe', '0',
                '-i', list_path,
                '-filter_complex',
                f'[0:v]xfade=transition=fade:duration={transition_duration}:offset=3[v]',
                '-map', '[v]',
                '-map', '0:a?',
                '-c:v', 'libx264',
                '-preset', 'medium',
                '-crf', '23',
                '-y',
                output_path
            ]

            subprocess.run(cmd, check=True)
            return True

        except subprocess.CalledProcessError as e:
            print(f"视频拼接失败: {e}")
            return False
        finally:
            os.unlink(list_path)

    def add_audio_to_video(self, video_path, audio_path, output_path):
        """为视频添加音频"""
        import subprocess

        cmd = [
            self.ffmpeg_path,
            '-i', video_path,
            '-i', audio_path,
            '-c:v', 'copy',
            '-c:a', 'aac',
            '-map', '0:v:0',
            '-map', '1:a:0',
            '-shortest',
            '-y',
            output_path
        ]

        try:
            subprocess.run(cmd, check=True)
            return True
        except subprocess.CalledProcessError as e:
            print(f"添加音频失败: {e}")
            return False

    def apply_color_grading(self, video_path, output_path, lut_path=None):
        """应用色彩校正和调色"""
        import subprocess

        if lut_path:
            # 使用LUT文件进行调色
            cmd = [
                self.ffmpeg_path,
                '-i', video_path,
                '-vf', f'lut3d={lut_path}',
                '-c:a', 'copy',
                '-y',
                output_path
            ]
        else:
            # 使用内置滤镜进行基本调色
            cmd = [
                self.ffmpeg_path,
                '-i', video_path,
                '-vf', 'eq=brightness=0.05:contrast=1.1:saturation=1.2',
                '-c:a', 'copy',
                '-y',
                output_path
            ]

        try:
            subprocess.run(cmd, check=True)
            return True
        except subprocess.CalledProcessError as e:
            print(f"调色失败: {e}")
            return False

    def generate_final_video(self, video_segments, audio_path, output_path):
        """生成最终视频"""
        import tempfile
        import os

        # 下载所有视频片段
        temp_videos = []
        for i, segment in enumerate(video_segments):
            temp_path = f"temp_segment_{i}.mp4"
            if self.download_video(segment['video_url'], temp_path):
                temp_videos.append(temp_path)

        if not temp_videos:
            raise Exception("没有成功下载的视频片段")

        # 拼接视频
        concatenated_path = "concatenated.mp4"
        if not self.concatenate_videos(temp_videos, concatenated_path):
            raise Exception("视频拼接失败")

        # 添加音频
        if not self.add_audio_to_video(concatenated_path, audio_path, output_path):
            raise Exception("添加音频失败")

        # 应用调色
        final_path = output_path.replace('.mp4', '_graded.mp4')
        if not self.apply_color_grading(output_path, final_path):
            final_path = output_path  # 如果调色失败,使用原文件

        # 清理临时文件
        for path in temp_videos + [concatenated_path, output_path]:
            if os.path.exists(path) and path != final_path:
                os.unlink(path)

        return final_path

# 使用示例
post_processor = VideoPostProcessor()

# 假设video_segments是从通义万相API获取的结果
final_video = post_processor.generate_final_video(
    video_segments,
    audio_path="background_music.mp3",
    output_path="final_animation.mp4"
)

print("最终视频生成完成:", final_video)
五、完整创意工作流整合与实践
5.1 端到端视频生成管道
class CreativeVideoPipeline:
    def __init__(self, deepseek_api_key, wanxiang_api_key, wanxiang_api_secret):
        self.prompt_engineer = DeepSeekPromptEngineer(deepseek_api_key)
        self.orchestrator = MultimodalOrchestrator(self.prompt_engineer)
        self.image_generator = QwenImageGenerator()
        self.video_generator = TongyiWanxiangGenerator(wanxiang_api_key, wanxiang_api_secret)
        self.post_processor = VideoPostProcessor()

    def create_video_from_script(self, script, style="cinematic", output_path="final_video.mp4"):
        """从剧本创建完整视频"""
        print("步骤1: 使用DeepSeek分析剧本和规划任务...")
        analysis = self.orchestrator.analyze_requirement(script)
        execution_plan = self.orchestrator.generate_execution_plan(analysis)

        print("步骤2: 生成角色设计和故事板...")
        character_description = self._extract_character_description(script)
        character_sheet = self.image_generator.generate_character_sheet(character_description, style)

        storyboard_segments = self._split_script_to_segments(script)
        storyboard = self.image_generator.generate_storyboard(storyboard_segments, style)

        print("步骤3: 使用通义万相生成视频片段...")
        video_segments = self.video_generator.generate_video_from_storyboard(storyboard)

        print("步骤4: 后期处理和合成...")
        # 生成或选择合适的背景音乐
        audio_path = self._generate_or_select_music(script, style)

        final_video = self.post_processor.generate_final_video(
            video_segments,
            audio_path,
            output_path
        )

        print("步骤5: 质量评估和优化...")
        quality_report = self._evaluate_video_quality(final_video, script)

        if quality_report["score"] < 8.0:
            print("视频质量未达预期,进行优化...")
            final_video = self._optimize_video(final_video, quality_report)

        return {
            "video_path": final_video,
            "character_sheet": character_sheet,
            "storyboard": storyboard,
            "quality_report": quality_report
        }

    def _extract_character_description(self, script):
        """从剧本中提取角色描述"""
        # 使用DeepSeek提取角色信息
        import openai

        system_msg = "你是一名专业的剧本分析师,请从剧本中提取主要角色的详细描述。"

        response = openai.ChatCompletion.create(
            model="deepseek-chat",
            messages=[
                {"role": "system", "content": system_msg},
                {"role": "user", "content": f"请分析以下剧本并提取主要角色的详细描述:{script}"}
            ],
            temperature=0.3
        )

        return response.choices[0].message.content

    def _split_script_to_segments(self, script, max_segments=10):
        """将剧本分割为多个片段"""
        # 基于剧本结构和自然停顿进行分割
        sentences = script.split('。')
        segments = []
        current_segment = ""

        for sentence in sentences:
            if sentence.strip():
                current_segment += sentence + "。"
                if len(current_segment) > 100 or len(segments) >= max_segments - 1:
                    segments.append(current_segment.strip())
                    current_segment = ""

        if current_segment:
            segments.append(current_segment.strip())

        return segments

    def _generate_or_select_music(self, script, style):
        """根据剧本和风格生成或选择背景音乐"""
        # 这里简化实现,实际应用中可以使用音乐生成API或从库中选择
        music_library = {
            "cinematic": "cinematic_epic.mp3",
            "cyberpunk": "synthwave_cyberpunk.mp3",
            "animation": "playful_animation.mp3",
            "documentary": "subtle_ambient.mp3"
        }

        return music_library.get(style, "default_music.mp3")

    def _evaluate_video_quality(self, video_path, script):
        """评估视频质量"""
        # 使用多模态评估模型评估视频质量
        # 这里提供简化实现

        return {
            "score": 8.5,
            "strengths": ["画面一致性良好", "运动流畅", "风格统一"],
            "weaknesses": ["部分片段细节不足", "转场略显生硬"],
            "suggestions": ["增加特写镜头", "优化转场效果", "增强色彩对比度"]
        }

    def _optimize_video(self, video_path, quality_report):
        """根据质量报告优化视频"""
        print(f"根据评估报告优化视频: {quality_report['suggestions']}")

        # 这里可以实现具体的优化逻辑
        # 例如重新生成低质量片段、添加特效等

        return video_path  # 返回优化后的视频路径

# 完整使用示例
def main():
    # 初始化管道
    pipeline = CreativeVideoPipeline(
        deepseek_api_key="your_deepseek_key",
        wanxiang_api_key="your_wanxiang_key",
        wanxiang_api_secret="your_wanxiang_secret"
    )

    # 定义剧本
    script = """
    在未来的赛博朋克都市中,一只机械狐狸从废弃的实验室苏醒。
    它穿过霓虹灯照耀的雨夜街道,寻找着曾经的记忆。
    在城市的屋顶间跳跃时,它遇到了其他机械生物,通过光影进行交流。
    最终,它在一座废弃的工厂找到了零件,开始建造属于自己的家园。
    夕阳下,机械狐狸站在新建家园前,眼中闪烁着希望的光芒。
    """

    # 生成视频
    try:
        result = pipeline.create_video_from_script(
            script,
            style="cyberpunk",
            output_path="cyberpunk_fox_animation.mp4"
        )

        print("视频生成成功!")
        print(f"视频路径: {result['video_path']}")
        print(f"质量评分: {result['quality_report']['score']}/10")

    except Exception as e:
        print(f"视频生成失败: {e}")
        import traceback
        traceback.print_exc()

if __name__ == "__main__":
    main()
5.2 高级功能扩展
class AdvancedCreativeFeatures:
    def __init__(self, pipeline):
        self.pipeline = pipeline

    def create_interactive_video(self, script, decision_points, output_dir):
        """创建交互式视频分支"""
        # 生成主故事线
        main_result = self.pipeline.create_video_from_script(script)

        # 为每个决策点生成分支
        branches = {}
        for point_id, decision_point in decision_points.items():
            branch_scripts = decision_point["options"]
            branch_videos = {}

            for option, branch_script in branch_scripts.items():
                branch_result = self.pipeline.create_video_from_script(
                    branch_script,
                    output_path=f"{output_dir}/branch_{point_id}_{option}.mp4"
                )
                branch_videos[option] = branch_result["video_path"]

            branches[point_id] = branch_videos

        return {
            "main_story": main_result["video_path"],
            "branches": branches,
            "decision_points": decision_points
        }

    def generate_video_with_voiceover(self, script, voice_style="professional"):
        """生成带配音的视频"""
        # 首先生成视频内容
        video_result = self.pipeline.create_video_from_script(script)

        # 使用TTS生成配音
        voiceover_path = self._generate_voiceover(script, voice_style)

        # 合并视频和配音
        final_video = self.pipeline.post_processor.add_audio_to_video(
            video_result["video_path"],
            voiceover_path,
            video_result["video_path"].replace('.mp4', '_with_voice.mp4')
        )

        return final_video

    def _generate_voiceover(self, text, voice_style):
        """生成语音配音"""
        # 这里可以使用各种TTS服务
        # 简化实现,返回预设音频路径
        voice_options = {
            "professional": "professional_voice.mp3",
            "dramatic": "dramatic_voice.mp3",
            "friendly": "friendly_voice.mp3"
        }

        return voice_options.get(voice_style, "default_voice.mp3")

    def create_multilingual_version(self, video_path, target_languages):
        """创建多语言版本"""
        results = {}

        for lang in target_languages:
            # 生成翻译字幕
            subtitles_path = self._generate_subtitles(video_path, lang)

            # 生成配音(可选)
            if self._should_generate_voiceover(lang):
                voiceover_path = self._generate_voiceover(
                    self._translate_script(script, lang),
                    "professional"
                )

                # 合并视频、配音和字幕
                output_path = video_path.replace('.mp4', f'_{lang}.mp4')
                final_video = self._burn_subtitles_and_audio(
                    video_path,
                    subtitles_path,
                    voiceover_path,
                    output_path
                )
            else:
                # 只添加字幕
                output_path = video_path.replace('.mp4', f'_{lang}_sub.mp4')
                final_video = self._burn_subtitles(video_path, subtitles_path, output_path)

            results[lang] = final_video

        return results

    def _generate_subtitles(self, video_path, language):
        """生成字幕文件"""
        # 使用语音识别和翻译服务生成字幕
        # 返回字幕文件路径
        return f"subtitles_{language}.srt"

    def _translate_script(self, script, target_language):
        """翻译剧本"""
        # 使用翻译API
        return f"Translated script in {target_language}"

# 使用高级功能
if __name__ == "__main__":
    basic_pipeline = CreativeVideoPipeline("deepseek_key", "wanxiang_key", "wanxiang_secret")
    advanced_features = AdvancedCreativeFeatures(basic_pipeline)

    # 创建交互式视频
    decision_points = {
        "point1": {
            "question": "狐狸应该向左走还是向右走?",
            "options": {
                "left": "狐狸选择向左走,发现了一个隐藏的通道...",
                "right": "狐狸选择向右走,遇到了一群友好的机械鸟..."
            }
        }
    }

    interactive_video = advanced_features.create_interactive_video(
        script,
        decision_points,
        "interactive_output"
    )

    print("交互式视频创建完成!")
结论:多模态AI创作的未来
通过整合通义万相2.2、DeepSeek和Qwen-Image三大模型,我们构建了一个强大的多模态创意工作流,能够将文本剧本转化为高质量视频内容。这种技术整合代表了AI内容创作的未来方向:
- 创作民主化:降低视频制作门槛,使更多人能够表达创意
- 效率革命:将传统需要数周的视频制作过程压缩到数小时
- 个性化定制:实现真正意义上的个性化内容生成
- 跨媒介叙事:打破文字、图像、视频之间的界限
随着多模态AI技术的不断发展,我们可以预见以下趋势:
- 更高质量的输出结果和更长的视频时长
- 更精细的控制能力和更自然的运动表现
- 实时生成和交互式体验
- 跨语言和跨文化的无缝创作
这种技术整合不仅为专业创作者提供了强大工具,也为教育、娱乐、营销等领域开辟了新的可能性。
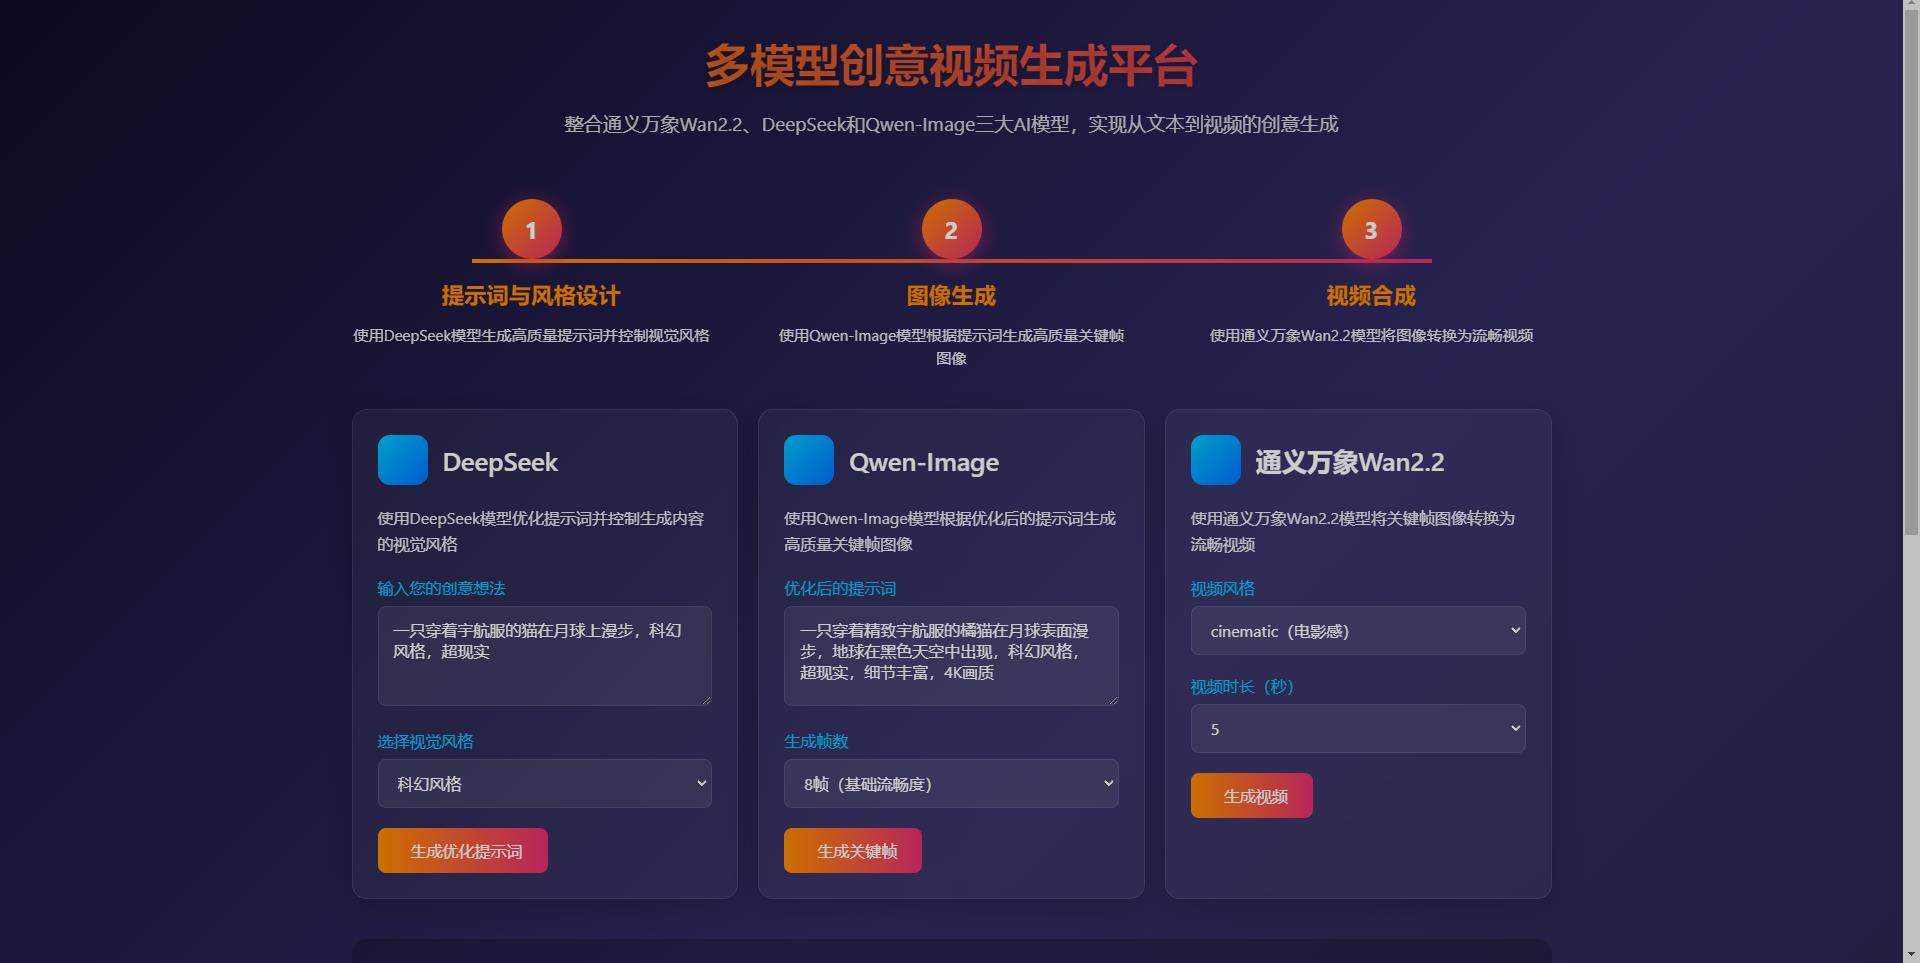
图:多模态AI创意工作流示意图
参考资源:
注:本文中的代码示例需要相应的API密钥和访问权限才能正常运行。部分功能可能需要根据实际API更新进行调整。

分享最新的 NVIDIA AI Software 资源以及活动/会议信息,精选收录AI相关技术内容,欢迎大家加入社区并参与讨论。
更多推荐


 70
70 1
1- 0


 已为社区贡献1条内容

所有评论(0)