
Qwen2-VL多模态大模型微调实战:完整代码解析,值得收藏!
Qwen2-VL是阿里通义实验室推出的多模态大模型。本文我们将简要介绍基于 transformers、peft 等框架,使用 Qwen2-VL-2B-Instruct 模型在COCO2014图像描述 上进行Lora微调训练,同时使用 SwanLab 监控训练过程与评估模型效果。
Lora 是一种高效微调方法,深入了解其原理可参见博客:知乎|深入浅出 Lora(https://zhuanlan.zhihu.com/p/650197598)
代码、数据、模型、训练过程链接见文末~
1 环境配置
环境配置分为三步:
-
确保你的电脑上至少有一张英伟达显卡,并已安装好了CUDA环境。
-
安装Python(版本>=3.8)以及能够调用CUDA加速的PyTorch。
-
安装Qwen2-VL微调相关的第三方库,可以使用以下命令:
python -m pip install --upgrade pip# 更换 pypi 源加速库的安装pip config set global.index-url https://pypi.tuna.tsinghua.edu.cn/simplepip install modelscope==1.18.0pip install transformers==4.46.2pip install sentencepiece==0.2.0pip install accelerate==1.1.1pip install datasets==2.18.0pip install peft==0.13.2pip install swanlab==0.3.25pip install qwen-vl-utils==0.0.8
2 准备数据集
本节使用的是 coco_2014_caption 数据集(中的500张图),该数据集主要用于多模态(Image-to-Text)任务。
数据集介绍:COCO 2014 Caption数据集是Microsoft Common Objects in Context (COCO)数据集的一部分,主要用于图像描述任务。该数据集包含了大约40万张图像,每张图像都有至少1个人工生成的英文描述语句。这些描述语句旨在帮助计算机理解图像内容,并为图像自动生成描述提供训练数据。
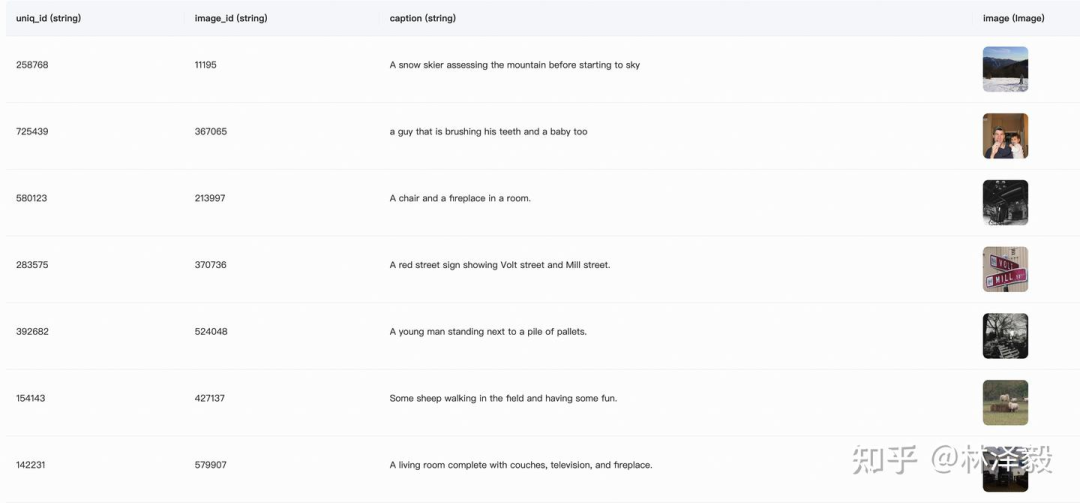
在本节的任务中,我们主要使用其中的前500张图像,并对它进行处理和格式调整,目标是组合成如下格式的json文件:
[{"id": "identity_1","conversations": [{"from": "user","value": "COCO Yes: <|vision_start|>图像文件路径<|vision_end|>"},{"from": "assistant","value": "A snow skier assessing the mountain before starting to sky"}]},...]
其中,"from"是角色(user代表人类,assistant代表模型),"value"是聊天的内容,其中<|vision_start|>和<|vision_end|>是Qwen2-VL模型识别图像的标记,中间可以放图像的文件路径,也可以是URL。
数据集下载与处理方式
-
我们需要做四件事情:
-
通过Modelscope下载coco_2014_caption数据集
-
加载数据集,将图像保存到本地
-
将图像路径和描述文本转换为一个csv文件
-
将csv文件转换为json文件
-
-
使用下面的代码完成从数据下载到生成csv的过程:
data2csv.py:
# 导入所需的库from modelscope.msdatasets import MsDatasetimport osimport pandas as pdMAX_DATA_NUMBER = 500# 检查目录是否已存在if not os.path.exists('coco_2014_caption'):# 从modelscope下载COCO 2014图像描述数据集ds = MsDataset.load('modelscope/coco_2014_caption', subset_name='coco_2014_caption', split='train')print(len(ds))# 设置处理的图片数量上限total = min(MAX_DATA_NUMBER, len(ds))# 创建保存图片的目录os.makedirs('coco_2014_caption', exist_ok=True)# 初始化存储图片路径和描述的列表image_paths = []captions = []for i in range(total):# 获取每个样本的信息item = ds[i]image_id = item['image_id']caption = item['caption']image = item['image']# 保存图片并记录路径image_path = os.path.abspath(f'coco_2014_caption/{image_id}.jpg')image.save(image_path)# 将路径和描述添加到列表中image_paths.append(image_path)captions.append(caption)# 每处理50张图片打印一次进度if (i + 1) % 50 == 0:print(f'Processing {i+1}/{total} images ({(i+1)/total*100:.1f}%)')# 将图片路径和描述保存为CSV文件df = pd.DataFrame({'image_path': image_paths,'caption': captions})# 将数据保存为CSV文件df.to_csv('./coco-2024-dataset.csv', index=False)print(f'数据处理完成,共处理了{total}张图片')else:print('coco_2014_caption目录已存在,跳过数据处理步骤')
3. 在同一目录下,用以下代码,将csv文件转换为json文件:
csv2json.py:
import pandas as pdimport json# 载入CSV文件df = pd.read_csv('./coco-2024-dataset.csv')conversations = []# 添加对话数据for i in range(len(df)):conversations.append({"id": f"identity_{i+1}","conversations": [{"from": "user","value": f"COCO Yes: <|vision_start|>{df.iloc[i]['image_path']}<|vision_end|>"},{"from": "assistant","value": df.iloc[i]['caption']}]})# 保存为Jsonwith open('data_vl.json', 'w', encoding='utf-8') as f:json.dump(conversations, f, ensure_ascii=False, indent=2)
此时目录下会多出两个文件:
-
coco-2024-dataset.csv
-
data_vl.json
至此,我们完成了数据集的准备。
3 模型下载与加载
这里我们使用modelscope下载Qwen2-VL-2B-Instruct模型,然后把它加载到Transformers中进行训练:
from modelscope import snapshot_download, AutoTokenizerfrom transformers import TrainingArguments, Trainer, DataCollatorForSeq2Seq, Qwen2VLForConditionalGeneration, AutoProcessorimport torch# 在modelscope上下载Qwen2-VL模型到本地目录下model_dir = snapshot_download("Qwen/Qwen2-VL-2B-Instruct", cache_dir="./", revision="master")# 使用Transformers加载模型权重tokenizer = AutoTokenizer.from_pretrained("./Qwen/Qwen2-VL-2B-Instruct/", use_fast=False, trust_remote_code=True)# 特别的,Qwen2-VL-2B-Instruct模型需要使用Qwen2VLForConditionalGeneration来加载model = Qwen2VLForConditionalGeneration.from_pretrained("./Qwen/Qwen2-VL-2B-Instruct/", device_map="auto", torch_dtype=torch.bfloat16, trust_remote_code=True,)model.enable_input_require_grads() # 开启梯度检查点时,要执行该方法
模型大小为 4.5GB,下载模型大概需要 5 分钟。
4 集成SwanLab
SwanLab 是一个开源的模型训练记录工具。SwanLab面向AI研究者,提供了训练可视化、自动日志记录、超参数记录、实验对比、多人协同等功能。在SwanLab上,研究者能基于直观的可视化图表发现训练问题,对比多个实验找到研究灵感,并通过在线链接的分享与基于组织的多人协同训练,打破团队沟通的壁垒。
SwanLab与Transformers已经做好了集成,用法是在Trainer的callbacks参数中添加SwanLabCallback实例,就可以自动记录超参数和训练指标,简化代码如下:
from swanlab.integration.transformers import SwanLabCallbackfrom transformers import Trainerswanlab_callback = SwanLabCallback()trainer = Trainer(...callbacks=[swanlab_callback],)
首次使用SwanLab,需要先在官网注册一个账号,然后在用户设置页面复制你的API Key,然后在训练开始提示登录时粘贴即可,后续无需再次登录:

更多用法可参考快速开始、Transformers集成。
5 开始微调
查看可视化训练过程:Qwen2-VL-finetune
本节代码做了以下几件事:
-
下载并加载Qwen2-VL-2B-Instruct模型
-
加载数据集,取前496条数据参与训练,4条数据进行主观评测
-
配置Lora,参数为r=64, lora_alpha=16, lora_dropout=0.05
-
使用SwanLab记录训练过程,包括超参数、指标和最终的模型输出结果
-
训练2个epoch
开始执行代码时的目录结构应该是:
|———— train.py|———— coco_2014_caption|———— coco-2024-dataset.csv|———— data_vl.json|———— data2csv.py|———— csv2json.py
完整代码如下
train.py:
import torchfrom datasets import Datasetfrom modelscope import snapshot_download, AutoTokenizerfrom swanlab.integration.transformers import SwanLabCallbackfrom qwen_vl_utils import process_vision_infofrom peft import LoraConfig, TaskType, get_peft_model, PeftModelfrom transformers import (TrainingArguments,Trainer,DataCollatorForSeq2Seq,Qwen2VLForConditionalGeneration,AutoProcessor,)import swanlabimport jsondef process_func(example):"""将数据集进行预处理"""MAX_LENGTH = 8192input_ids, attention_mask, labels = [], [], []conversation = example["conversations"]input_content = conversation[0]["value"]output_content = conversation[1]["value"]file_path = input_content.split("<|vision_start|>")[1].split("<|vision_end|>")[0] # 获取图像路径messages = [{"role": "user","content": [{"type": "image","image": f"{file_path}","resized_height": 280,"resized_width": 280,},{"type": "text", "text": "COCO Yes:"},],}]text = processor.apply_chat_template(messages, tokenize=False, add_generation_prompt=True) # 获取文本image_inputs, video_inputs = process_vision_info(messages) # 获取数据数据(预处理过)inputs = processor(text=[text],images=image_inputs,videos=video_inputs,padding=True,return_tensors="pt",)inputs = {key: value.tolist() for key, value in inputs.items()} #tensor -> list,为了方便拼接instruction = inputsresponse = tokenizer(f"{output_content}", add_special_tokens=False)input_ids = (instruction["input_ids"][0] + response["input_ids"] + [tokenizer.pad_token_id])attention_mask = instruction["attention_mask"][0] + response["attention_mask"] + [1]labels = ([-100] * len(instruction["input_ids"][0])+ response["input_ids"]+ [tokenizer.pad_token_id])if len(input_ids) > MAX_LENGTH: # 做一个截断input_ids = input_ids[:MAX_LENGTH]attention_mask = attention_mask[:MAX_LENGTH]labels = labels[:MAX_LENGTH]input_ids = torch.tensor(input_ids)attention_mask = torch.tensor(attention_mask)labels = torch.tensor(labels)inputs['pixel_values'] = torch.tensor(inputs['pixel_values'])inputs['image_grid_thw'] = torch.tensor(inputs['image_grid_thw']).squeeze(0) #由(1,h,w)变换为(h,w)return {"input_ids": input_ids, "attention_mask": attention_mask, "labels": labels,"pixel_values": inputs['pixel_values'], "image_grid_thw": inputs['image_grid_thw']}def predict(messages, model):# 准备推理text = processor.apply_chat_template(messages, tokenize=False, add_generation_prompt=True)image_inputs, video_inputs = process_vision_info(messages)inputs = processor(text=[text],images=image_inputs,videos=video_inputs,padding=True,return_tensors="pt",)inputs = inputs.to("cuda")# 生成输出generated_ids = model.generate(**inputs, max_new_tokens=128)generated_ids_trimmed = [out_ids[len(in_ids) :] for in_ids, out_ids in zip(inputs.input_ids, generated_ids)]output_text = processor.batch_decode(generated_ids_trimmed, skip_special_tokens=True, clean_up_tokenization_spaces=False)return output_text[0]# 在modelscope上下载Qwen2-VL模型到本地目录下model_dir = snapshot_download("Qwen/Qwen2-VL-2B-Instruct", cache_dir="./", revision="master")# 使用Transformers加载模型权重tokenizer = AutoTokenizer.from_pretrained("./Qwen/Qwen2-VL-2B-Instruct/", use_fast=False, trust_remote_code=True)processor = AutoProcessor.from_pretrained("./Qwen/Qwen2-VL-2B-Instruct")model = Qwen2VLForConditionalGeneration.from_pretrained("./Qwen/Qwen2-VL-2B-Instruct/", device_map="auto", torch_dtype=torch.bfloat16, trust_remote_code=True,)model.enable_input_require_grads() # 开启梯度检查点时,要执行该方法# 处理数据集:读取json文件# 拆分成训练集和测试集,保存为data_vl_train.json和data_vl_test.jsontrain_json_path = "data_vl.json"with open(train_json_path, 'r') as f:data = json.load(f)train_data = data[:-4]test_data = data[-4:]with open("data_vl_train.json", "w") as f:json.dump(train_data, f)with open("data_vl_test.json", "w") as f:json.dump(test_data, f)train_ds = Dataset.from_json("data_vl_train.json")train_dataset = train_ds.map(process_func)# 配置LoRAconfig = LoraConfig(task_type=TaskType.CAUSAL_LM,target_modules=["q_proj", "k_proj", "v_proj", "o_proj", "gate_proj", "up_proj", "down_proj"],inference_mode=False, # 训练模式r=64, # Lora 秩lora_alpha=16, # Lora alaph,具体作用参见 Lora 原理lora_dropout=0.05, # Dropout 比例bias="none",)# 获取LoRA模型peft_model = get_peft_model(model, config)# 配置训练参数args = TrainingArguments(output_dir="./output/Qwen2-VL-2B",per_device_train_batch_size=4,gradient_accumulation_steps=4,logging_steps=10,logging_first_step=5,num_train_epochs=2,save_steps=100,learning_rate=1e-4,save_on_each_node=True,gradient_checkpointing=True,report_to="none",)# 设置SwanLab回调swanlab_callback = SwanLabCallback(project="Qwen2-VL-finetune",experiment_name="qwen2-vl-coco2014",config={"model": "https://modelscope.cn/models/Qwen/Qwen2-VL-2B-Instruct","dataset": "https://modelscope.cn/datasets/modelscope/coco_2014_caption/quickstart","github": "https://github.com/datawhalechina/self-llm","prompt": "COCO Yes: ","train_data_number": len(train_data),"lora_rank": 64,"lora_alpha": 16,"lora_dropout": 0.1,},)# 配置Trainertrainer = Trainer(model=peft_model,args=args,train_dataset=train_dataset,data_collator=DataCollatorForSeq2Seq(tokenizer=tokenizer, padding=True),callbacks=[swanlab_callback],)# 开启模型训练trainer.train()# ====================测试模式===================# 配置测试参数val_config = LoraConfig(task_type=TaskType.CAUSAL_LM,target_modules=["q_proj", "k_proj", "v_proj", "o_proj", "gate_proj", "up_proj", "down_proj"],inference_mode=True, # 训练模式r=64, # Lora 秩lora_alpha=16, # Lora alaph,具体作用参见 Lora 原理lora_dropout=0.05, # Dropout 比例bias="none",)# 获取测试模型val_peft_model = PeftModel.from_pretrained(model, model_id="./output/Qwen2-VL-2B/checkpoint-62", config=val_config)# 读取测试数据with open("data_vl_test.json", "r") as f:test_dataset = json.load(f)test_image_list = []for item in test_dataset:input_image_prompt = item["conversations"][0]["value"]# 去掉前后的<|vision_start|>和<|vision_end|>origin_image_path = input_image_prompt.split("<|vision_start|>")[1].split("<|vision_end|>")[0]messages = [{"role": "user","content": [{"type": "image","image": origin_image_path},{"type": "text","text": "COCO Yes:"}]}]response = predict(messages, val_peft_model)messages.append({"role": "assistant", "content": f"{response}"})print(messages[-1])test_image_list.append(swanlab.Image(origin_image_path, caption=response))swanlab.log({"Prediction": test_image_list})# 在Jupyter Notebook中运行时要停止SwanLab记录,需要调用swanlab.finish()swanlab.finish()
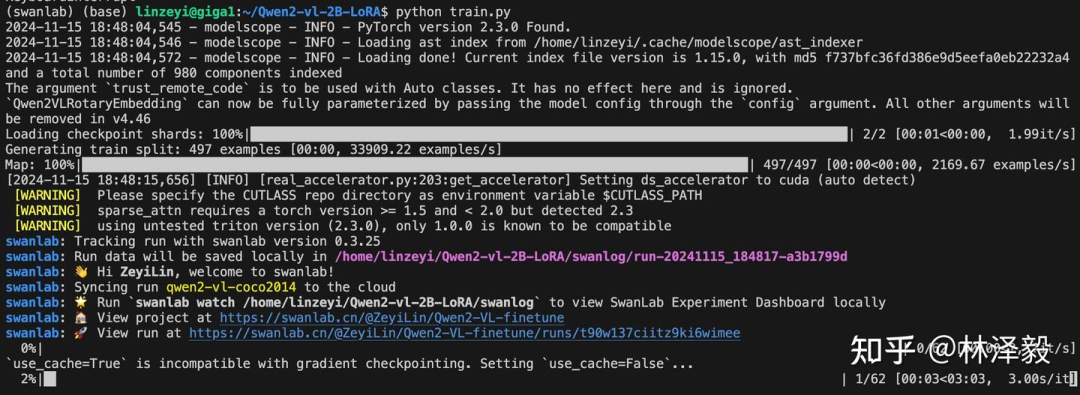
看到下面的进度条即代表训练开始:
6 训练结果演示
详细训练过程请看这里:qwen2-vl-coco2014
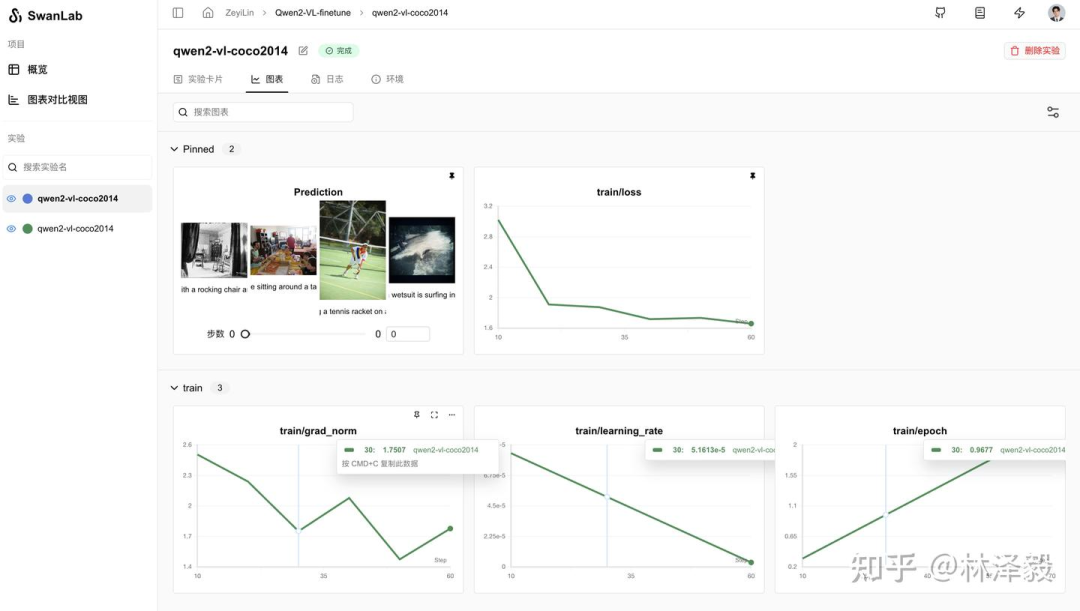
从SwanLab图表中我们可以看到,lr的下降策略是线性下降,loss随epoch呈现下降趋势,而grad_norm则在上升。这种形态往往反映了模型有过拟合的风险,训练不要超过2个epoch。
在Prediction图表中记录着模型最终的输出结果,可以看到模型在回答的风格上是用的COCO数据集的简短英文风格进行的描述:
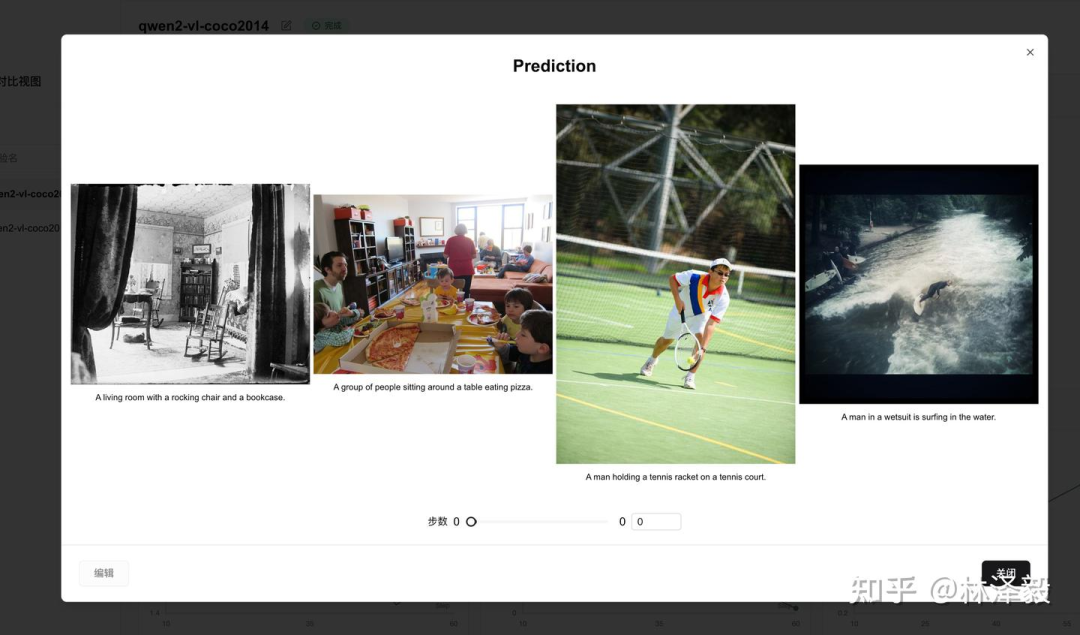
而同样的图像,没有被微调的模型输出结果如下:
1-没有微调:The image depicts a cozy living room with a rocking chair in the center, a bookshelf filled with books, and a table with a vase and a few other items. The walls are decorated with wallpaper, and there are curtains on the windows. The room appears to be well-lit, with sunlight streaming in from the windows.1-微调后:A living room with a rocking chair, a bookshelf, and a table with a vase and a bowl.2-没有微调:It looks like a family gathering or a party in a living room. There are several people sitting around a dining table, eating pizza. The room has a cozy and warm atmosphere.2-微调后:A group of people sitting around a dining table eating pizza.
可以明显看到微调后风格的变化。
7 推理LoRA微调后的模型
加载lora微调后的模型,并进行推理:
from transformers import Qwen2VLForConditionalGeneration, AutoProcessorfrom qwen_vl_utils import process_vision_infofrom peft import PeftModel, LoraConfig, TaskTypeconfig = LoraConfig(task_type=TaskType.CAUSAL_LM,target_modules=["q_proj", "k_proj", "v_proj", "o_proj", "gate_proj", "up_proj", "down_proj"],inference_mode=True,r=64, # Lora 秩lora_alpha=16, # Lora alaph,具体作用参见 Lora 原理lora_dropout=0.05, # Dropout 比例bias="none",)# default: Load the model on the available device(s)model = Qwen2VLForConditionalGeneration.from_pretrained("./Qwen/Qwen2-VL-2B-Instruct", torch_dtype="auto", device_map="auto")model = PeftModel.from_pretrained(model, model_id="./output/Qwen2-VL-2B/checkpoint-62", config=config)processor = AutoProcessor.from_pretrained("./Qwen/Qwen2-VL-2B-Instruct")messages = [{"role": "user","content": [{"type": "image","image": "测试图像路径",},{"type": "text", "text": "COCO Yes:"},],}]# Preparation for inferencetext = processor.apply_chat_template(messages, tokenize=False, add_generation_prompt=True)image_inputs, video_inputs = process_vision_info(messages)inputs = processor(text=[text],images=image_inputs,videos=video_inputs,padding=True,return_tensors="pt",)inputs = inputs.to("cuda")# Inference: Generation of the outputgenerated_ids = model.generate(**inputs, max_new_tokens=128)generated_ids_trimmed = [out_ids[len(in_ids) :] for in_ids, out_ids in zip(inputs.input_ids, generated_ids)]output_text = processor.batch_decode(generated_ids_trimmed, skip_special_tokens=True, clean_up_tokenization_spaces=False)print(output_text)
8 补充
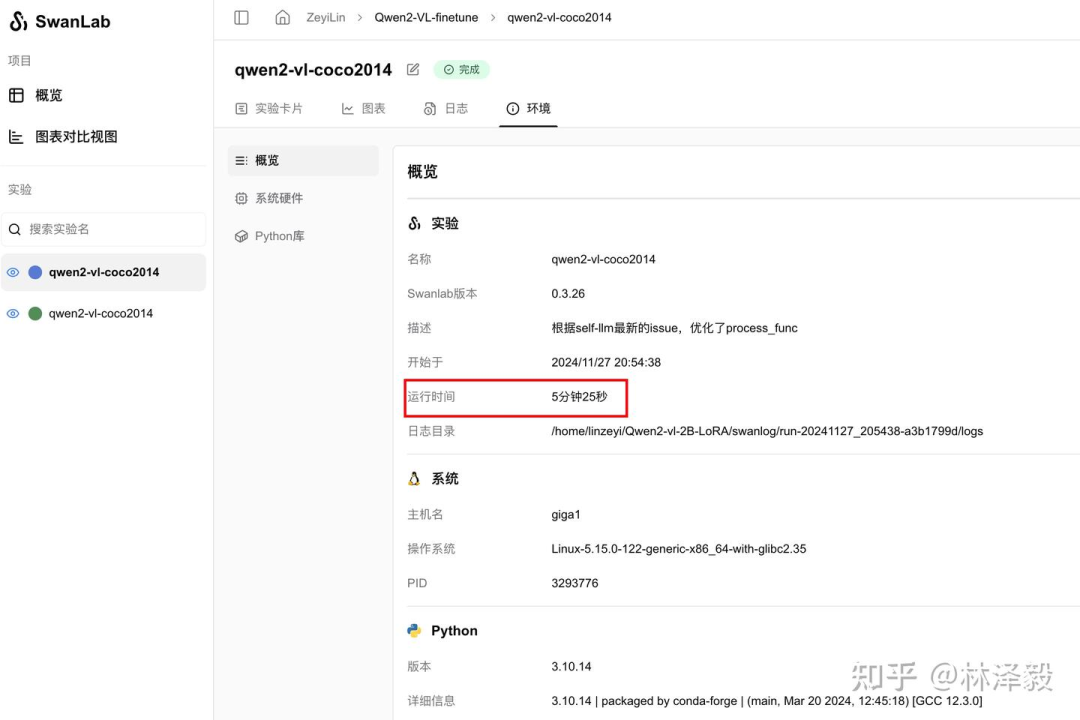
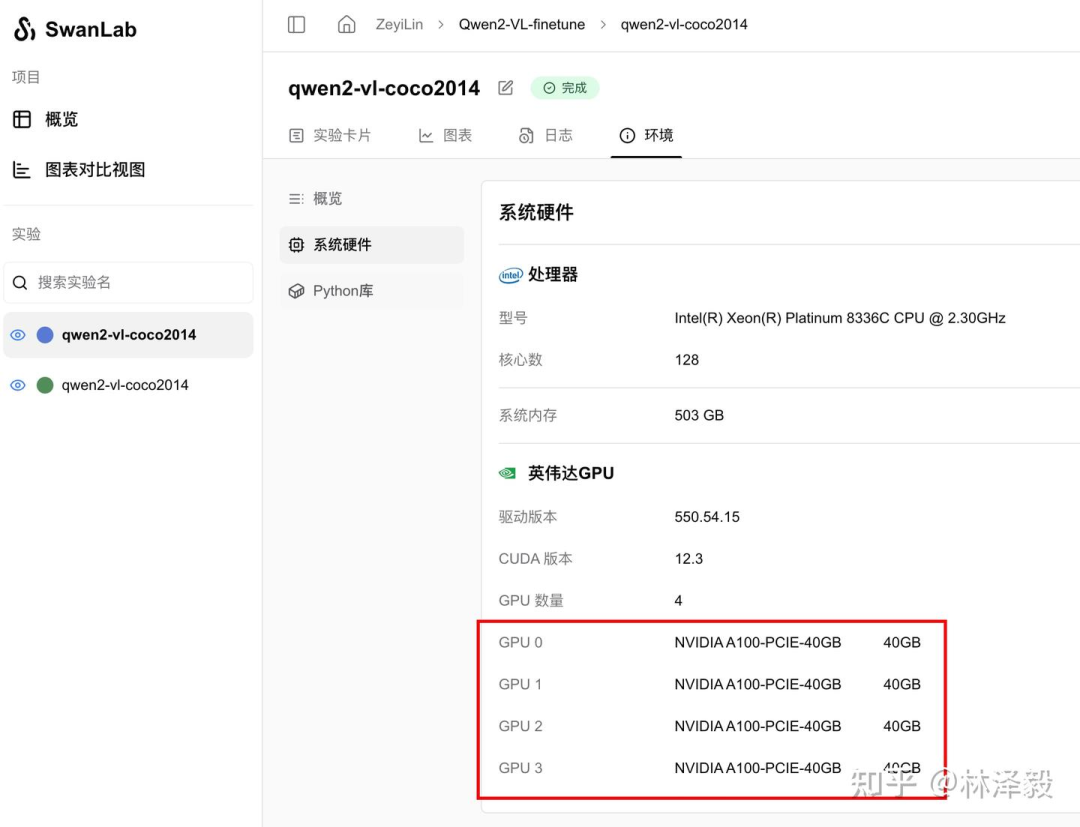
详细硬件配置和参数说明
使用4张A100 40GB显卡,batch size为4,gradient accumulation steps为4,训练2个epoch的用时为1分钟57秒。
注意
-
在微调脚本中,
val_peft_model加载的是一共固定的checkpoint文件,如果你添加了数据或超参数,请根据实际情况修改checkpoint文件路径。
大模型&AI产品经理如何学习
求大家的点赞和收藏,我花2万买的大模型学习资料免费共享给你们,来看看有哪些东西。
1.学习路线图

第一阶段: 从大模型系统设计入手,讲解大模型的主要方法;
第二阶段: 在通过大模型提示词工程从Prompts角度入手更好发挥模型的作用;
第三阶段: 大模型平台应用开发借助阿里云PAI平台构建电商领域虚拟试衣系统;
第四阶段: 大模型知识库应用开发以LangChain框架为例,构建物流行业咨询智能问答系统;
第五阶段: 大模型微调开发借助以大健康、新零售、新媒体领域构建适合当前领域大模型;
第六阶段: 以SD多模态大模型为主,搭建了文生图小程序案例;
第七阶段: 以大模型平台应用与开发为主,通过星火大模型,文心大模型等成熟大模型构建大模型行业应用。
2.视频教程
网上虽然也有很多的学习资源,但基本上都残缺不全的,这是我自己整理的大模型视频教程,上面路线图的每一个知识点,我都有配套的视频讲解。


(都打包成一块的了,不能一一展开,总共300多集)
因篇幅有限,仅展示部分资料,需要点击下方图片前往获取
3.技术文档和电子书
这里主要整理了大模型相关PDF书籍、行业报告、文档,有几百本,都是目前行业最新的。

4.LLM面试题和面经合集
这里主要整理了行业目前最新的大模型面试题和各种大厂offer面经合集。

👉学会后的收获:👈
• 基于大模型全栈工程实现(前端、后端、产品经理、设计、数据分析等),通过这门课可获得不同能力;
• 能够利用大模型解决相关实际项目需求: 大数据时代,越来越多的企业和机构需要处理海量数据,利用大模型技术可以更好地处理这些数据,提高数据分析和决策的准确性。因此,掌握大模型应用开发技能,可以让程序员更好地应对实际项目需求;
• 基于大模型和企业数据AI应用开发,实现大模型理论、掌握GPU算力、硬件、LangChain开发框架和项目实战技能, 学会Fine-tuning垂直训练大模型(数据准备、数据蒸馏、大模型部署)一站式掌握;
• 能够完成时下热门大模型垂直领域模型训练能力,提高程序员的编码能力: 大模型应用开发需要掌握机器学习算法、深度学习框架等技术,这些技术的掌握可以提高程序员的编码能力和分析能力,让程序员更加熟练地编写高质量的代码。

1.AI大模型学习路线图
2.100套AI大模型商业化落地方案
3.100集大模型视频教程
4.200本大模型PDF书籍
5.LLM面试题合集
6.AI产品经理资源合集***
👉获取方式:
😝有需要的小伙伴,可以保存图片到wx扫描二v码免费领取【保证100%免费】🆓


分享最新的 NVIDIA AI Software 资源以及活动/会议信息,精选收录AI相关技术内容,欢迎大家加入社区并参与讨论。
更多推荐

 29
29 0
0- 0


 已为社区贡献2条内容

所有评论(0)